How to Sew an Understitch
Understitching is a basic sewing technique that is crucial in achieving a professional finish to your handmade garments and is actually quite enjoyable too (IMHO). Find out what an understitch is, why it is so important plus step by step photos and a video of how to complete this essential sewing task.
What is an Understitch?
There are a number of ways to finish the raw edges of armholes, necklines, pockets and waistbands and more often than not it will be with a lining or facing.
Linings usually mirror that area of the garment entirely or you might get a half lining that finishes half way down the garment for example.
A facing is a piece of fabric, usually a couple of inches deep, that sits inside the garment.
In both cases the lining or facing is sewn in place along the armhole or neckline with right sides together then folded over to sit inside the garment, which is where you want it to stay.
An understitch is sewn along the edge of the lining or facing nearest the armhole or neckline and works to secure the lining or facing to the seam allowances which in turn keeps everything neatly tucked inside the garment instead of poking out and being visible from the right side.
Although it sits on the inside of your garment, understitching is visible so it is worth striving for a neat finish. It is also a nice easy technique to master.
Preparing a Seam for Understitching
Firstly sew the main fabric to the lining or facing, right sides together.

Trim and grade the seams trimming them both to half then trimming the facing or lining in half again. You can find a tutorial on how to trim and grade seams here.

In many areas where understitching is required, for example, armholes and necklines, the seamline will be curved. If this is the case you will also need to snip the seam allowances to the seamline about every 1/4" taking care not to snip through the seamline.

This is an important step since it will allow you to manoeuvre the fabric into a straight line when sewing the understitch. It will also help things to lie nice and flat rather than looking bulky.
Sewing an Understitch
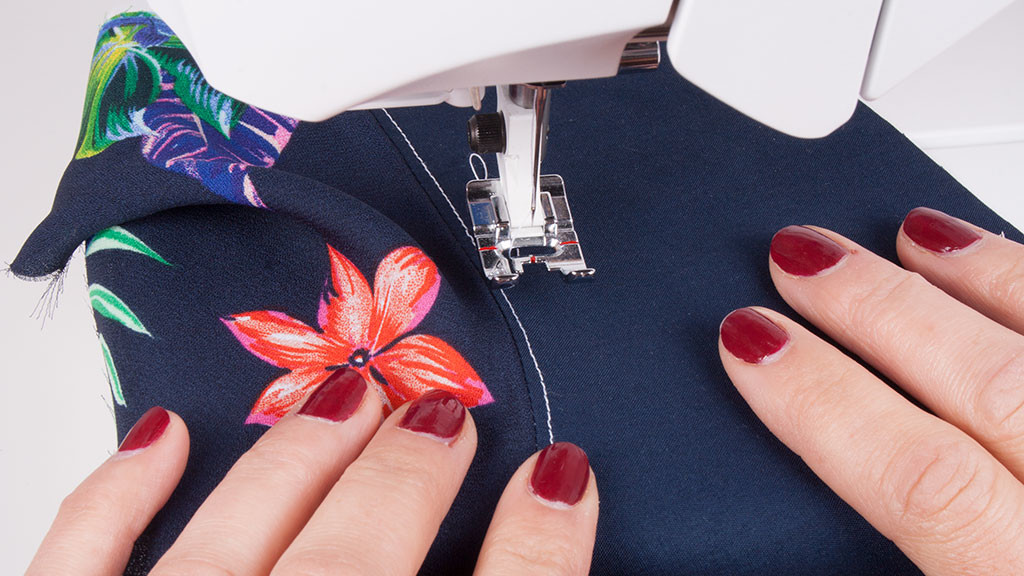
Position the fabric on your machine right sides up with the main garment fabric to the left of the needle and the facing or lining to the right.

Ensure the seam allowances are tucked under the facing or lining.

Start stitching about 1/8" away from where the main fabric and lining or facing meet, on the lining/facing side catching the seam allowances as you sew and back stitching at either end to secure.
As you sew very gently pull the two pieces of fabric away from one another, which will help encourage the seam allowances to stay tucked under the facing or lining once finished.

It is also worth stopping to check the seam allowances are still positioned correctly under the lining or facing every now and again.
You might not be able to get all the way to the end of your seam, if this is the case just sew as far as you can.
The End Result
Once you've finished you should have a neat line of visible stitches on the right side of the lining or facing.

On the wrong side you will see the seamline and the understiching running parallel to one another.

Press the lining or facing to the inside of the garment so they are not visible from the right side.

And there you have it - professional results every time. Confession time, it's very sad, but this is one of my favourite sewing tasks - how geeky am I?!
Have fun sewing!
Lucy
For more tips and tricks on how to make sewing easy you can follow our blog via Bloglovin and receive updates via email each time a new post is added.
Follow us on Facebook Twitter YouTube and Instagram for news, tutorials, special offers, sales and more.