
This week I'm thrilled to bring you my contribution to the McCalls Cocktail Hour blogger tour. If you haven't already heard the McCalls pattern company have selected 20 gorgeous Vogue cocktail dress patterns for the initiative (see the list at the bottom of this post). Over the next seven months a contribution from the sale of each and every one of the designated patterns will be donated to the Eve Appeal, a charity that raises funds to fight the five women's only cancers.
To promote the initiative 26 bloggers have been selected to take part in a tour and make their favourite pattern. There is also a yummy cocktail recipe and you can share your makes and join in the fun using the hashtag #sipandsew. So grab a cuppa cocktail and have a read about my most exquisite and challenging make to date!
As soon as I saw the chosen patterns I knew I had to make Vogue 1428. Sadly this pattern has now been discontinued, but you can find all of our Vogue patterns here. I have alwaysloved this pattern. In fact it featured in one of the first pinboards I created for our Sew Essential Pinterest account. It would have taken me an awfully long time to ever get around to actually making something this extravagant so being asked to take part in the Cocktail Hour was a very welcome excuse.

Designing the Dress
Naturally I wanted to put my own spin on things so I started brainstorming plus I'm a massive fan of machine embroidery. Almost immediately thought I could incorporate embroidery into the design rather than lace. I was ridiculously excited at the prospect, especially seeing as embroidery is one of the biggest trends around right now. I was also incredibly lucky to get my hands on a Husqvarna Diamond embroidery machine just in time for this project too. It was simply meant to be.

I started looking around for inspiration and decided I wanted to make a pencil skirt rather than the A-line skirt. Our gorgeous John Kaldor Duchesse satinwas the perfect fabric for the pencil skirt. It is impossible to describe the beautiful quality of this fabric in words! It is so luxurious and absolutely perfect for any special occasion project.

In a nod to the original skirt design we thought it would be fun to include a detachable tulle A line overlay in the same tulle as I planned to make the overbodice. This way I could wear the dress without the overlay for less formal occasions and dress it up to the max with the overlay if I was going somewhere super special. You know, like Sainsburys.

The more the ideas were coming together the more excited I became! I couldn't believe I would be making something so fancy.
Next it was time to decide on the embroidery colours. Where else would one go other than Pinterest of course? I created a pinboard of embroidered dresses and my goodness there were some beauties! We were unable to source a coloured tulle to match the other fabrics I would be using so I decided to go for classic black and took inspiration from these amazing gowns for the embroidery colours.

I thought the pastel colours looked really striking against the black and also made the dress feel more summery.
Fitting the Underbodice
Next it was time to crack on with making the dress. This involved a lot of toille-ing. I wanted to get the perfect fit.
The underbodice was definitely designed with a more voluptuous lady than me in mind! I cut a size 12 and made a small bust adjustment to get the fit right.
I added 1/2" along the front neckline because it looked a little low cut and I also had to take 1/4" off each side of the underbodice to get it to match the pencil skirt.
Sewing the Underbodice
I decided to make it in black rather than nude as suggested on the pattern packet. I used the most beautiful lightweight satin backed crepe. The matt side has a slight sheen to it, almost like a wet look fabric, but much more subtle. I used the matt side for the visible side of the underbodice and lined it with the satin side, which feels beautiful against the skin. We do have some of this fabric in stock, although it isn't on the website. If you would like to get your hands on some email the office and we will be happy to help...if we haven't sold out.

I was nervous about sewing with this delightful fabric because it was soooo slippery and lightweight. I used my walking foot and the Diamond machine and it was a breeze. I'm absolutely certain that using such an excellent machine really helped. You actually select the type of fabric you are working with and it adjusts to the right tension. How cool is that?!
I did my usual trick and made the rouleau straps on my overlocker and hand stitched the underbodice lining in place at the very end for a professional finish.
I was pretty nervous about sewing an invisible zip into the underbodice/skirt due to the fabrics, but using basting tape to hold it in place worked like a dream.
Fitting the Overbodice
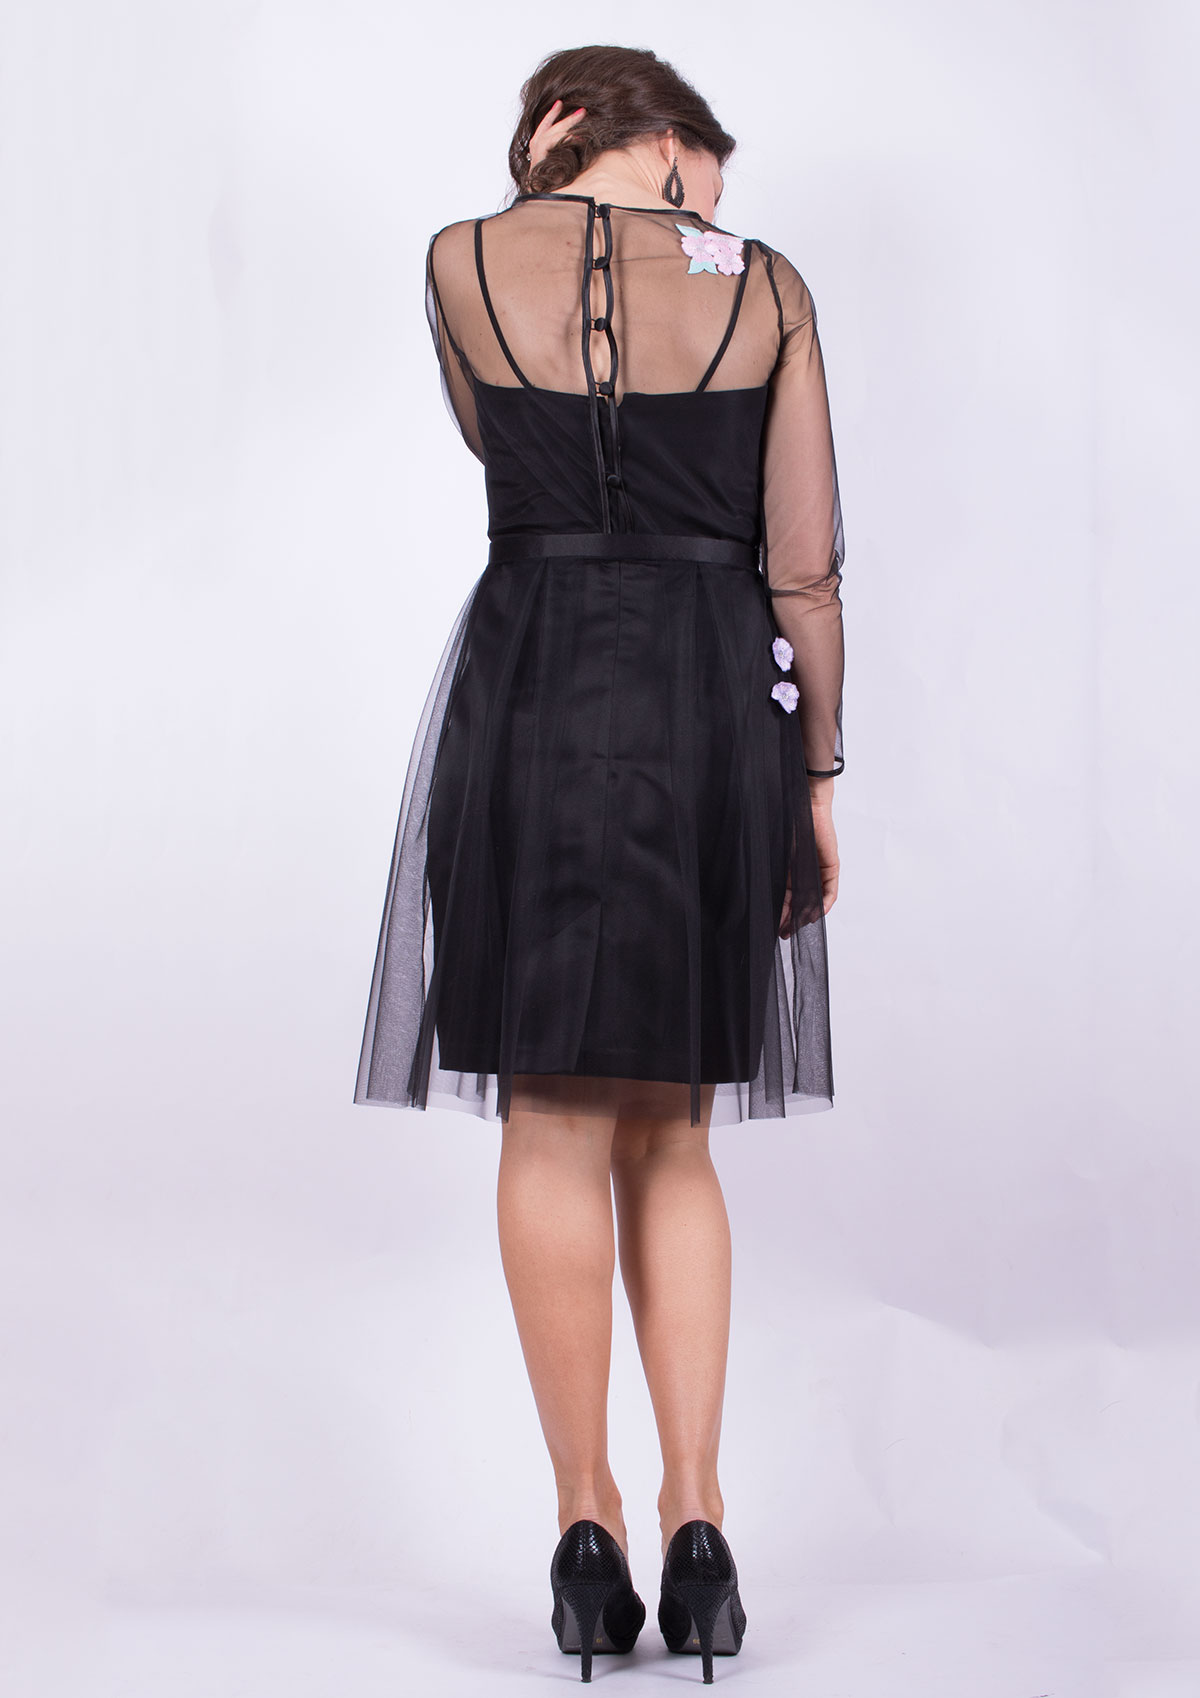
I made a toille of the overbodice and subsequently made a number of adjustments to it. Firstly I made a high round back adjustment, essentially increasing the size of the pattern piece to accommodate the upper back. I also reduced the amount of gathering required at the sides of the overbodice by pinning some of the fullness out of the original pattern piece. I moved the shoulder seams forward about 1/8" or so and pinned some fullness out of the neckline at the front and back to prevent gaping.
Embroidering the Overbodice
Once we were happy with the fit it was time to start the embroidery. We were really lucky to find a design that I liked and fitted the dress immediately. Next it was a matter of playing around with the thread colours and testing machine embroidery on the tulle. We used a washaway stabiliser and the results were excellent.

I used Gutermann Sulky Rayon threads for the embroidery in colours 1121, 1111, 1254, 1045 and 1204. To add a little bit of sparkle I also used Gutermann Sulky Holoshimmer thread in silver. As soon as I saw the results I loved it. I mean what is not to love about a disco thread?!
I was able to manipulate the original design to create another smaller design, which I placed on the back shoulder and the hip.


Sewing the Overbodice
I sewed French seams at the side seams, shoulder seams and sleeve seams for a neat finish. Using a tearaway stabiliser prevented the fabric from being chewed up by my machine and made sewing the tulle easy.
I was quite honestly petrified when it came to finishing the armholes. Every muscle in my body was tense as I pushed my foot down on the overlocker foot control! I used a short, narrow three thread overlock and overlocked the seams together. Clearly I tested it first on scraps of tulle, but nonetheless it was a scary moment.
I finished the cuffs, neckline and centre back with satin bias binding and used tearaway stabiliser to get the best results. I've never used satin bias before and one thing I learned - this stuff frays like mad! Leave as much at the ends as you can and then trim it down to size.
I used self cover buttons and covered them in the Duchesse satin for the fastenings at the back. I created my own hand stitched button loops by sewing a loop then sewing a blanket stitch all the way around the loop.

Sewing the Tulle Skirt
I cut a size 12 in the skirt and added enough extra seam allowance onto each side to create an additional pleat and pump up the volume! Instead of a centre back seam I cut the front of the skirt in two pieces. This created an opening at the front and I cut the back in a single piece. I used satin bias to finish the edges of the opening at the front.
For the waistband I cut a piece of the Duchesse satin the same width as the iron on waistband stiffener I was using and a few inches longer than my waist.
I pinned the pleats in place making sure the side seams of the tulle overlay sat over the side seams of the pencil skirt. Next I machine stitched the waistband to the tulle overlay then hand sewed the other side in place. A couple of snap fasteners were strong enough to hold the waistband together.
The free standing embroidered flowers were created using a single flower from the original embroidery design. I ironed a small square of iron on interfacing onto the back of the tulle and machine fix stitched the flowers in place.

Unfortunately after several nights sewing until the wee small hours I didn't quite manage to make the satin bow I had planned for the waistband. I was shattered!
What Next?!
As you can see this dress was a massive undertaking. Well by my standards anyway! When I first started sewing 18 months ago I never dreamed I would be able to create something like this.
I would also like to say a massive thank you to the lovely team at McCalls for inviting me to take part in the blogger tour. This project gave me the excuse I needed to challenge myself and make something so wonderfully fancy. I have learned so many new techniques along the way and my sewing confidence has increased tenfold.
When I think about my main sewing influences there is a great deal of focus on creating a wearable handmade wardrobe. I'm a big believer in making garments that are the foundation of my daily wardrobe. However, this project made me realise it is just as important to make something elaborate every once in a while. Perhaps every 12 months I plan to choose a project I would never normally make and work with fabrics I wouldn't normally work with.
Check Out the Vlog
I also made a short video of me in the dress talking about the dress in case you are interested. It includes a cool little time lapse of me making the embroidery.
Cheers everyone! Don't forget to join in the fun and raise money for a great cause by buying any of the patterns listed below.


Cocktail Hour Patterns
- Vogue dress 1471
- Vogue dress 8943
- Vogue dress 1428
- Vogue jumpsuit 9160
- Vogue clutch bags 9164
- Vogue top, skirt and trousers 9229
- Vogue dress 9148
- Vogue dress and cover up 1532
- Vogue jacket and dress 1536
- Vogue 8997
- Vogue jacket and dress 1537
- Vogue dress 1484
- Vogue dress 1208
- Vogue dress 1531
- Vogue tunic and trousers 1415
- Vogue dress 9241
- Vogue asymmetrical hem tunic and jumpsuit 1539
- Vogue kimono 1505
- Vogue dress 1434
- Vogue dress 1182
Have fun sewing!
Lucy
For more tips and tricks on how to make sewing easy you can follow our blog via Bloglovin and receive updates via email each time a new post is added.
Follow us on Facebook Twitter YouTube and Instagram for news, tutorials, special offers, sales and more.