How to Draft Patterns Using a Basic Block by Neela Mistry-Bradshaw
How to Draft Patterns Using a Basic Block by Neela Mistry-Bradshaw
March 24, 2016
We’ve got a juicy post for you this week on the Sew Essential blog – Neela Mistry-Bradshaw, a former contestant of the Great British Sewing Bee, has written our first guest blog post and it’s a corker! Neela used one of our basic block patterns to design and make herself a beautiful dress using fabric and haberdashery from Sew Essential (full shopping list at the end of the article).
So sit back, relax and let Neela take you step by step through her sewing adventure, then why not have a go yourself?! Over to Neela...
Many of the clothes I make for myself are hacks of existing patterns but when I sew for my young girls, I tend to self-draft. I like the idea of customising and adding individuality to my sewing. These methods have worked well for me over the years but this time I’m going to try designing a dress using a ready-made block pattern.
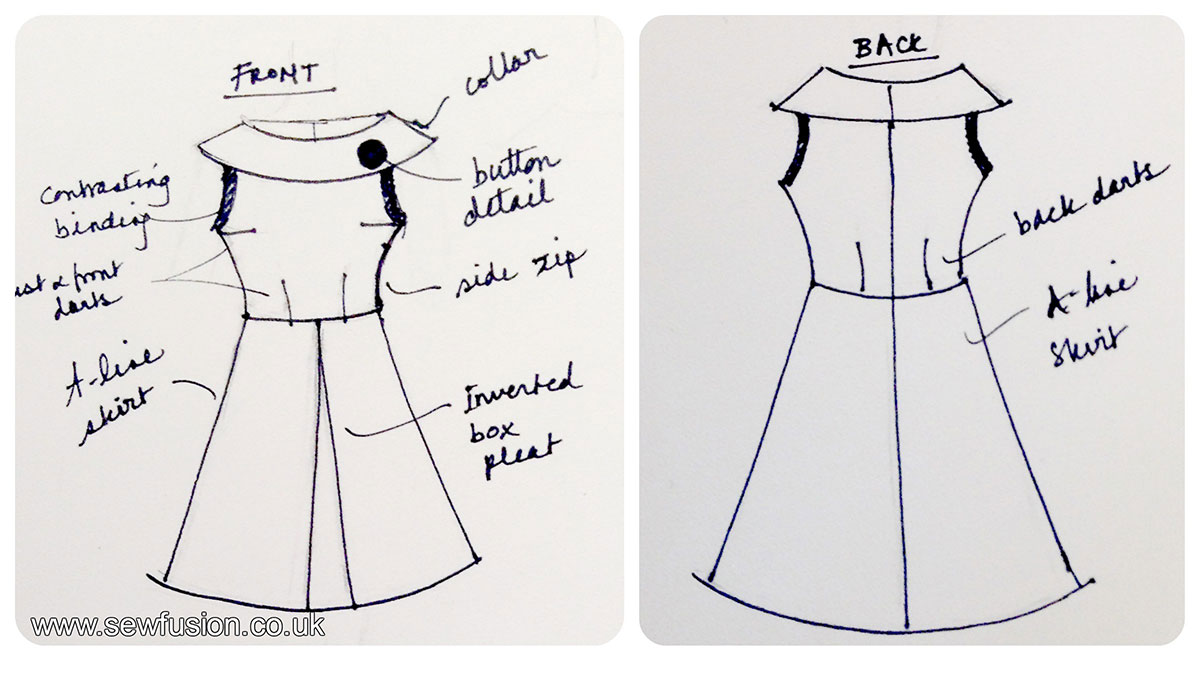
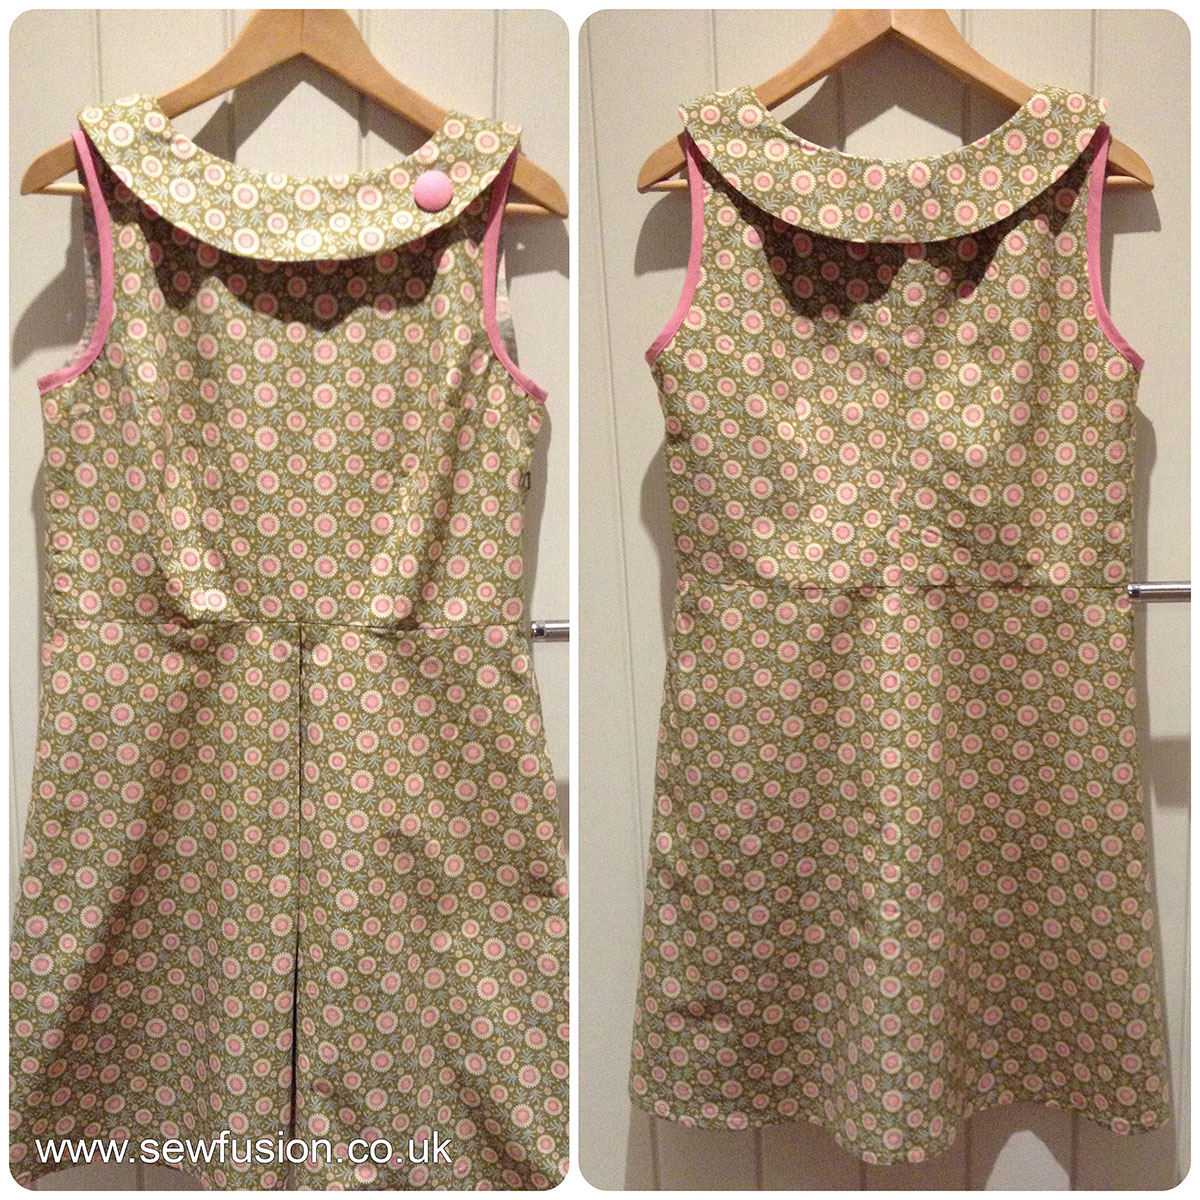
In this post I’m testing the Shoben Women’s Wear Basic Block Pattern provided by Lucy at Sew Essential. I’ve designed a 1960s inspired dress for myself using the block pattern and then sewn it up using some pretty fabric.
The dress I’ve designed has a sleeveless bodice finished with bias-binding on the armholes, a round collar with button detail, an A-line skirt with an inverted box pleat to the front and an 8” zip inserted to the left side.
The Shoben Women’s Wear Basic Block Pattern
The block pattern I’ve used includes a basic bodice, sleeve and skirt. I’m making a sleeveless dress so I’ve used the bodice and skirt blocks.
The block pattern is very basic and not dis-similar to a normal dressmaking patterns. It includes ease, darts and guidelines for bust, waist and hip, although seam allowances, notches, grainlines, zip/button placement and other markings need to be added, depending on the final design.
Blocks are a great starting point if you want to design well-fitted garments for yourself or for others, although a good knowledge of using patterns and the basics on how to construct garments is the pre-requisite for using blocks, if you are thinking of using them.
Key Points to Note Before Using the Block
Before tracing off the block, it is important to:
Take accurate body measurements, e.g. bust, waist, hips.
Ascertain the length of the skirt by measuring from the waist down to the desired length (hip to knee and knee to floor height measurements are given).
Take additional measurements such as nape to waist length, shoulder point to shoulder point, upper bust, bust point and any other measurements you would normally alter when using a normal pattern.
To ensure you trace off the right size from the block pattern, the next steps need concentration and time.
The block I’ve used provides standard measurements for a size 12, the difference is -/+5cm if you want to grade up or down a size. You will need to calculate which size you are for each measurement (e.g. bust, waist, hips, etc.).
Ease measurement is already included in the block measurements. To work this out you will need to subtract your measurement (for each area (e.g. bust, waist, hips, etc.)) from the block pattern measurement.
My measurements against the block pattern measurements (including ease), meant that I had to think carefully about which sizes I needed to trace off. I tend to work on 2” ease for the bust and hips and 1” around the waist for woven fabrics but this varies depending on the style of garment I’m making. So for coats/jackets I might increase the ease but for knits this will be reduced or eliminated.
I made the following decisions:
The ease measurement for my bust on the block was 4” which is far too large, 2” is more realistic, so I went down a size.
I graded up 2 sizes on the waist and up 1 size on the hip. The ease on the waist and hips were more reasonable at 2” and 1.5” respectively. I left the hip ease at 1.5” as I was inserting an inverted box pleat.
I had to grade from a size 12 on the bust to a 16 on the waist and to a 14 on the hips. In ready to wear clothes I’m normally a size 12/14 so this just proves that you should always go by your actual body measurements rather than a standard pattern size.
Testing the Bodice and Skirt Blocks
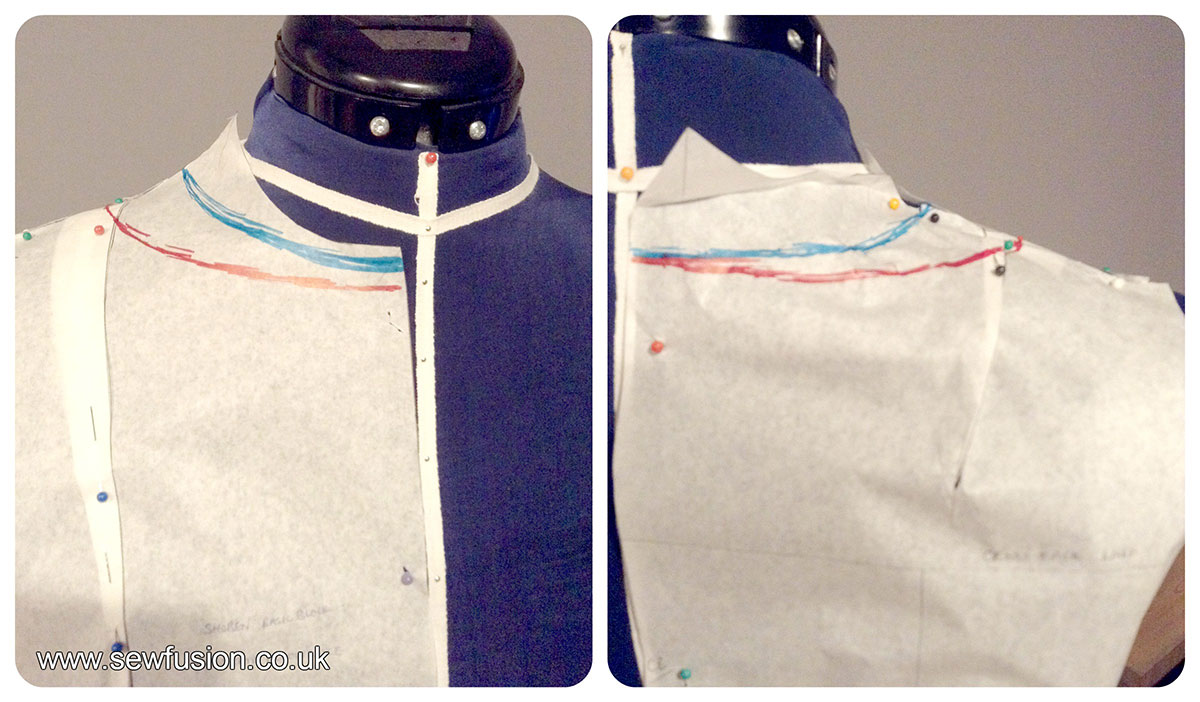
Once I was happy with the sizes, I traced off the front and back bodice and skirt block pieces (without seam allowances). This is also a good time to make any other adjustments such as nape to waist length increases/decreases, shoulder point to shoulder point or bust adjustments, etc. I cut and pinned the pattern pieces onto my mannequin (Dolly).
With the pieces pinned on Dolly, I could immediately see where the problem areas were: the back and front necklines were too high and I needed to widen the bodice towards the centre front and centre back.
The bodice sides needed a little extra width and the waist needed extra ease on both the bodice and skirt blocks. (I know I was being a little too optimistic on my waist measurement which I purposefully made ½” smaller than normal – hence the snug fit!). I also marked out where I might reduce the nape to waist length but I didn’t need it. However I can use this if I want to design a dress with a more flattering higher waistline.
Making the pattern for the bodice
The bodice design for my 1960s inspired dress is sleeveless with a circular collar and a large button detail. The dress has an 8” zip inserted to the left side.
As I was quite confident with the initial bodice block, I decided to retrace the block and make the following adjustments:
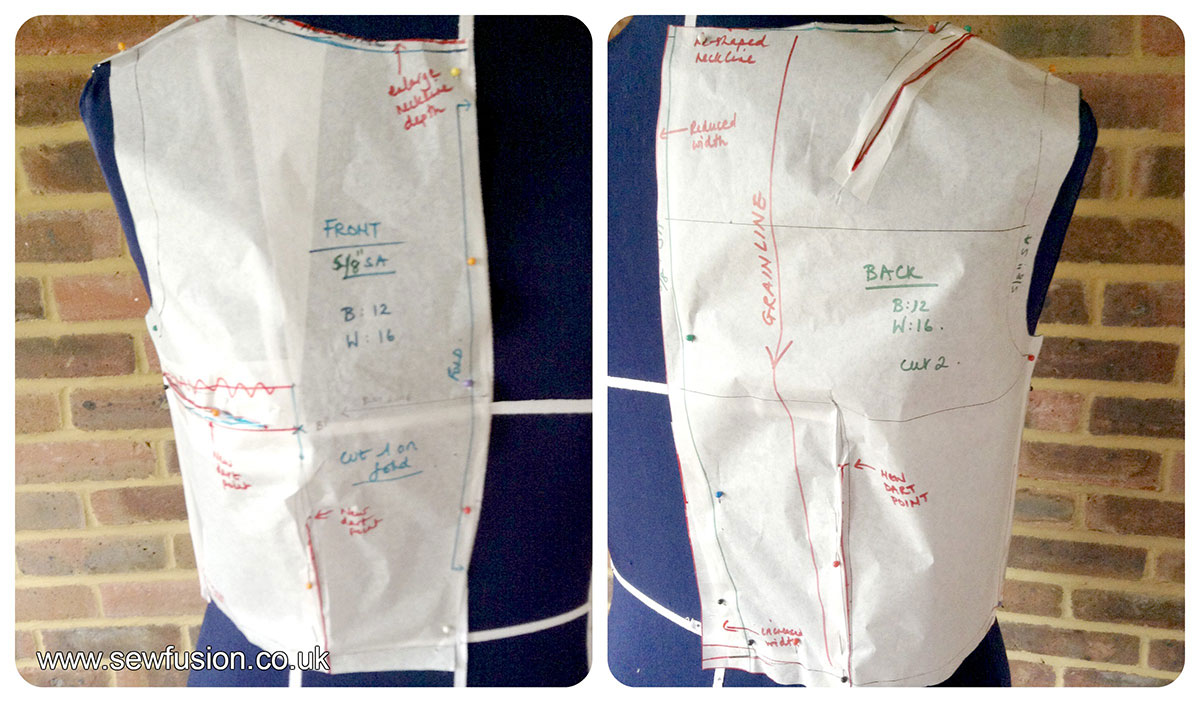
Bodice front
Removing the shoulder dart and adding a dart to the bodice side (using the slash and spread method).
Redrawing the neckline, making it wider and slightly lower.
Re-positioning the bust point and reducing the length of the dart.
Bodice back
Shortening the length of the waist dart.
Reducing the height of the back neckline and widening it.
Shifting the position of the back shoulder dart sideways to accommodate the wider neckline.
Once the adjustments were made, I added, notches, grainlines and instructions such as “place on fold”, etc.
Finally I added a 5/8” seam allowance around the pattern.
Making the pattern for the skirt
The skirt I’ve designed for the 1960’s inspired dress is A-line with an inverted box pleat to the front.
I made the following adjustments to the front skirt block to achieve my desired skirt design.
Removing the waist dart but adding a 2” insertion to the base of the base to widen the skirt and make it more A-line.
Adding an inverted box pleat (3” wide to half the skirt block) and a ½” flare adjustment to the side of the pleat, so that the pleat sits nicely and doesn’t pull).
Adjusting the skirt length to the desired length.
Adding a ¼” bias adjustment to the bottom of the side seam. This enables the sides of the A-Line skirt (which are cut at a slight bias), to drop slightly and level up with the height of the bottom of the skirt. (If a bias adjustment is not made, your skirt sides may drop and look longer at the sides.)
Front skirt block
Back skirt block
For the back skirt block I:
Removed the dart and added a 2” insertion.
Added seam allowance to the centre back.
Adjusted the skirt length to the desired length.
Added a ¼” bias adjustment to the bottom of the side seam.
Once the adjustments were made, I added a 5/8” seam allowance around the pattern, notches, grainlines and instructions, etc. I re-tested the bodice and skirt blocks by re-pinning them on Dolly to check for fit and further adjustments were made to the neckline.
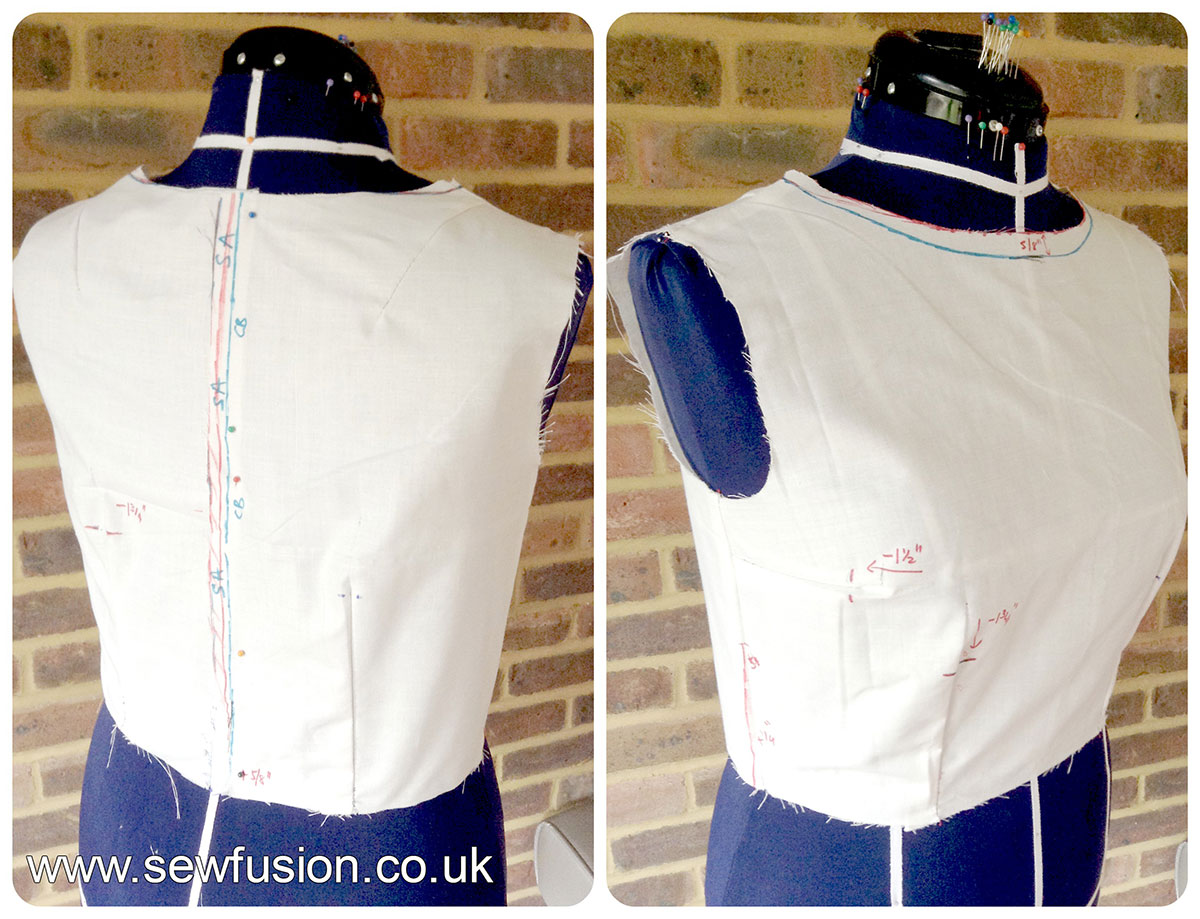
Making Up the Toile
I made up a toile of the bodice in calico using the adjusted pattern pieces to double check fit. I basted the seams and darts and then tried it on. It is very difficult to self-fit but I managed to get my daughter to help me a little, just to give me a rough idea of fit. It’s better to get help from a friend though!
I finished off adjusting the toile on Dolly and then made a few amendments on the paper pattern pieces. Further adjustments included:
Reducing the width of the back bodice at the top but widening it towards the bottom.
Increasing the width on the bottom of the side seams.
I didn’t make a toile of the skirt but I did adjust the width of the waist on the pattern, increasing it to the same waist width as the bodice. I don’t tend to make toiles unless the pattern I‘m using needs a lot of adjustments. I prefer to make adjustments on the paper pattern (as they tend to be the same ones I do on every pattern), and then make final minor adjustments once I’ve sewn up the pattern in fabric.
Drafting the Collar
To draft the collar, I traced off the neckline on the bodice front and back and added seam allowances.
I wanted a seam on the centre back, so I taped the front and back collar pieces at the shoulder seams, omitting the seam allowance. The collar was then cut on the fold at the centre front.
The Finished Dress
Although this has been a lengthy process, I now have a block pattern that fits and also a unique pattern made to my size that fits well. I will be using the block to design more dresses in the future and will definitely be using these to design more dresses for my girls.
To see more pictures of my 1960s inspired dress, please visit www.sewfusion.co.uk
If you're excited by what Neela created and want to give it a go yourself, head over to Sew Essential and grab your tools! Alternatively, why not read our article 'How to Achieve the Perfect Fit from your Sewing Pattern' and start by using existing sewing patterns to make small changes to get the right fit for you.
Don’t forget to sign up for our newsletter for more sewing inspiration, tutorials, and exclusive offers.