
I decided to start the New Year with a bang: sewing my first ever pair of jeans. I made a series of quick, simple sews at the end of last year then had a break from sewing over Christmas. Refreshed and reinvigorated it was time for a challenge. I chose the Jalie Eleonore pull on jeans pattern, winner of the 'best pants/jeans pattern' award on Pattern Review for the last two years, and our mid blue stretch denim. I thought it would be a good way to dip my toe in the water and start the learning journey of fitting trousers. Find out what I learned, my thoughts on the pattern and why I recommend giving jeans a go.
Initial Preparation
I knew the fit would be the most challenging aspect. Let's face it, I struggle to find a pair of ready to wear jeans that fit well. I took the last cut length of some stretch denim we had in stock and set to work on a toile. I decided to increase the seam allowances from 3/8" to 5/8" at the side and in seams to give me more to play with when fitting. In keeping with these adjustments I also increased the width of the yoke and waistband pieces to match. I cut a size V.
As a starting point I measured the front and back crotch seams of one of my favourite, best fitting pairs of trousers and compared it to the pattern pieces. It appeared that the length was about 1/8" longer on the pattern. I decided not to adjust the pattern because there was extra room rather than not enough and the amount was minimal.

Making the Toile
I can't quite remember how this happened, but I ended up in a situation where I was only able to make one full leg due to a lack of fabric! I decided to make it up to get an idea of the fit and then crack on with the real thing. Clearly this was a big mistake and really rendered the toile fairly useless!
However, I was able to see there was a fitting problem at the back crotch seam. It was too high and fabric was disappearing up my bum as a result! I 'scooped' the crotch about 1/8" at the back and levelled it off at the front. Scooping is essentially deepening the crotch curve by trimming away some fabric to make more room.
I could also see the hips were too big, but I knew I could adjust this at the side seams fairly easily. I decided to wait until I had two legs to make these adjustments!
When I tried the leg on post scooping the fit was much better. Great, I thought, let's go!
Construction
I cannot find the words to tell you how much I loved the construction of this pattern. It was all thanks to the wonderful video created by Jalie patterns. In just 21 minutes they demonstrate every single step of the construction. Yes you read it right - 21 minutes. No need to read any instructions just watch the video and pause it whenever you need to. No waffle, no fuss, just a straight forward demonstration. It was the most excellent way to tackle every step with maximum confidence. All hail step by step pattern instruction videos!
Here is the video in case you are interested.
Jalie have produced these videos for a number of their patterns, not all. You can view our full range of Jalie patterns here then look on the Jalie website to see if they have created a video for the ones you like.
The pattern is well drafted and everything fitted together beautifully.
Fitting
Confident my jeans were going to fit me perfectly thanks to my one legged toile I happily stitched away. I was thoroughly enjoying the top stitching thanks to my seam marker foot. If you haven't got one of these they are awesome and make accurate stitching a doddle. This is the one I use, but make sure you check our compatibility charts for your machine. We have a range of other brands on the website if mine isn't suitable for your machine and don't hesitate to ask if you need any help.
My jeans were looking super duper. When I got to the point of sewing the side seams and inseams I decided to baste them and try them on first. Thank God I did! The fit was excellent at the front and terrible at the back. I had the most enormous puddles of excess fabric at the top of my thighs. As expected they were also way too big around the hips. I decided to absorb the hip excess into the side seams then reassess the situation.
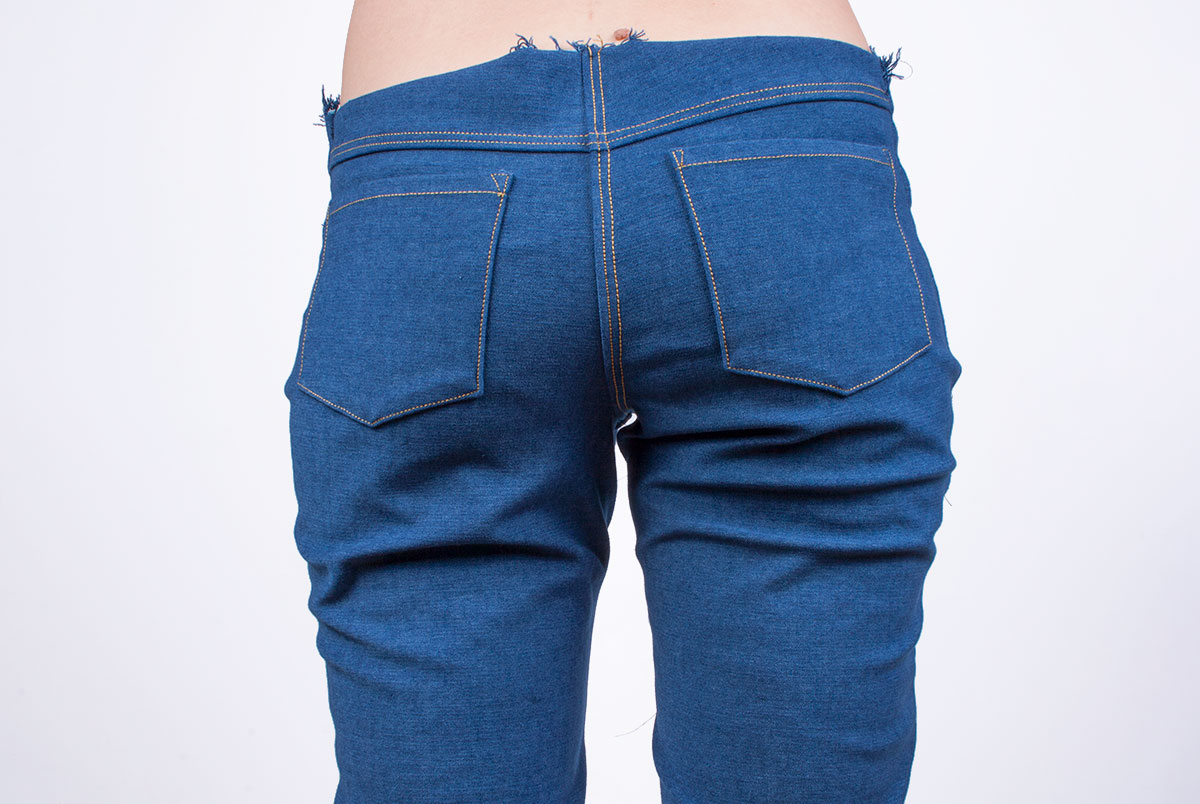
The fit across my bum and hips was better, but the drag lines across the top of the back of my thighs were still there in all their glory. Time to investigate.
Test One: Full Thigh Adjustment
After a bit of research I decided I probably needed to make a full thigh adjustment. This involved moving the back in seam to create more room for my thighs. I reduced the seam allowance on the back inseam to 1/4" from the crotch to the knee tapering back to the 5/8" seam beyond this point.
I tried them on again and the drag lines were still just as bad. Clearly it wasn't the full thigh issue I thought it was. I was surprised because I do have full thighs.
Test Two: Dropping the Crotch Curve
After a bit more research I found I was not alone. There were so many people documenting the same back of thigh excess fabric problem. Then I came across a suggestion by Heather Lou from Closet Case Patterns to try dropping the crotch curve. We stock her range of awesome patterns, you can find them here. I'm planning to try the incredibly popular Ginger jeans pattern next, which also won a 'best pants/jeans pattern' award with Pattern Review this year.
Following the instructions I dropped the curve 1/2" at the back. This meant the back inseam was 1/2" shorter than the front inseam. Heather's instructions suggested easing the excess fabric in. I did this with a basting stitch so I could assess the fit again. The drag lines had definitely improved, but hadn't disappeared completely.
I felt like I was onto a winner. I decided to drop the curve by a further 1/2", baste then try on again. Hallelujah it worked! The drag lines weren't altogether eliminated, but some room is necessary for movement and I was thrilled with the results.

More Fitting
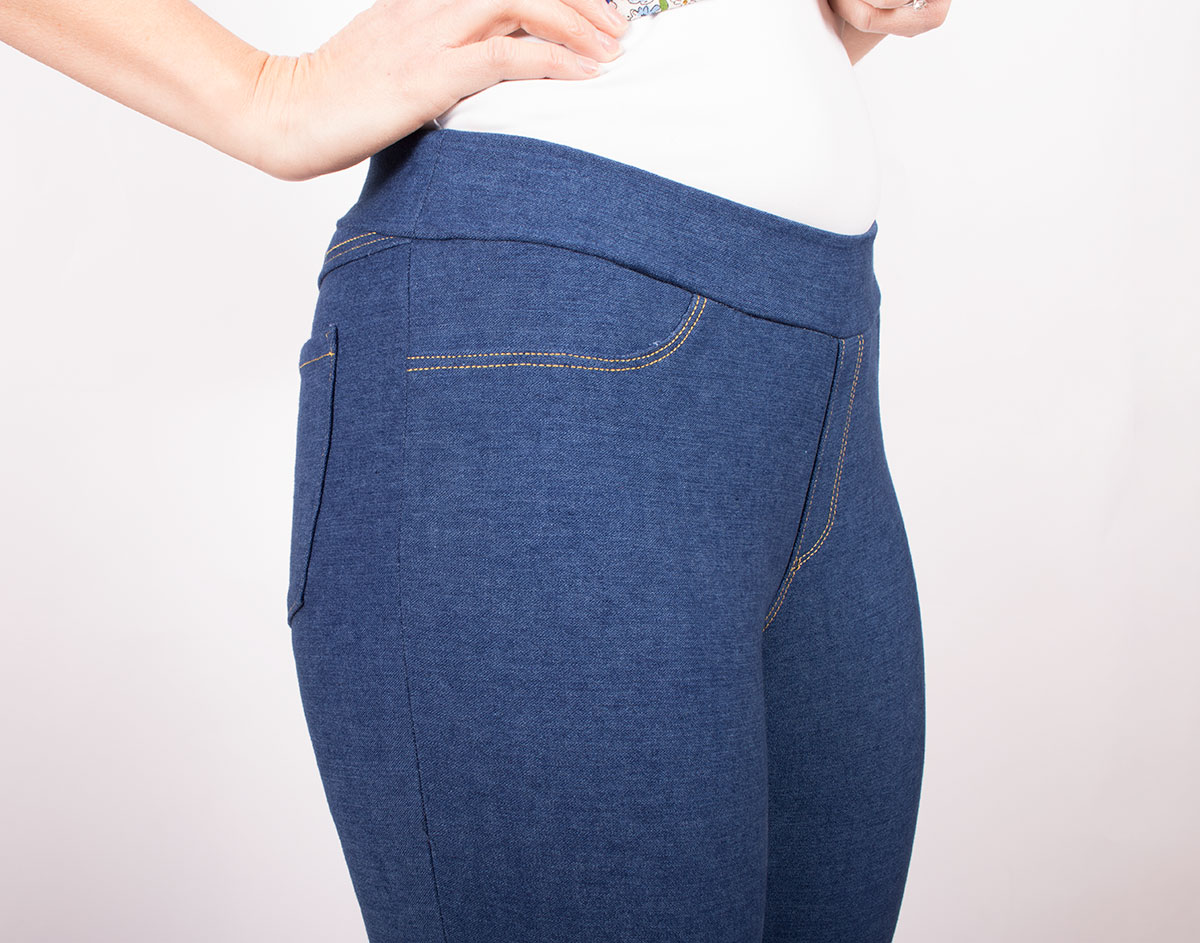
I was not home and dry yet. For some reason the adjustments I made had pushed the side seams forward at my hips. Luckily I had a lot of excess seam allowance to work with at the hips as a result of taking them in at the hips earlier. To bring the seamline forward I reduced the seam allowance on the back piece tapering back to the normal allowance where the seamline was in the correct position (about halfway down my thigh).
This meant I now had more excess at the hips again, but I would be able to ease it into the waistband. After reducing the size of the waistband until I was happy with the fit I eased the excess hip area fabric in. Some careful pressing and hey presto.
I have to say, this denim was truly amazing to work with. It pressed beautifully, eased beautifully and could be steamed back into shape. It was very, very forgiving and perfect for working on a project like this where there were a lot of modifications!
I also had to shorten the jeans by a couple of inches. I'm 5' 6" with a 31" inside leg.
Skinnyfying the Jeans
In addition to the step by step tutorial video Jalie have also produced a tutorial for skinnyfying the jeans. The only sacrifice you have to make for the first pair is skipping the inseam top stitching to allow you to make the adjustments.
In a nutshell you baste the jeans then try them on inside out and get someone to help you pin out the excess. Baste again and repeat until you are happy with the fit.
Lie the two legs on top of one another and pin through the four layers of fabric along the new seamline. Mark the new seamline on the second leg using the pins as a guide then sew.
Jalie suggest keeping the excess fabric and transferring the markings onto your pattern pieces so you can see the skinny option for next time. I decided to simply make a note that I took 1 and 1/8" off each side at the hem and tapered this back to the standard seamline 24" up from the hem.

Lessons Learned
Firstly I'm so glad I got over the fear of making jeans and just had a go! There is a lot to learn and this is only my first step on what I expect to be a long journey, but I thoroughly enjoyed it. There really is nothing to be scared of and it isn't the end of the world if things go wrong.
Make a full toile, one leg doesn't cut it. Yes, you're right, this is pretty obvious and you probably don't need me to tell you!
Clearly the majority of my fitting issues were to do with the crotch. Measuring the crotch on a pair of well fitting trousers and comparing it to the pattern pieces didn't work. You can't be sure what the seam allowances of the ready to wear pair were. Plus different fabrics behave differently. Next time I would work on the crotch on a full toile until I was happy.
Baste together and try on before top stitching. I had to unpick some very successful top stitching and my second attempt at matching up the yoke top stitching across the centre back seam post fitting was nowhere near as good as my first. Annoying.

Cut out the right size. I don't know how I did it, but I cut a size to two sizes too big. This caused me the issues at the hips, which I was able to rectify, but next time I would definitely cut at least one size smaller.
This is a great pattern to start with. The fantastic construction video and lack of a fly front allow you to just focus on fit.
Be prepared to continue to hone your skills and understanding. I am so, so happy with these jeans and know they will get a huge amount of wear. I feel such a massive sense of achievement having completed them and can't wait to make subsequent pairs to perfect the fit.
The fact the construction is incredibly quick and simple makes up for the time you may have to spend on fitting. The buzz at the end of the project is addictive.
I would also like to apologise for all the photos of my bum! If you're into sewing you get it though, right?!

Shopping List
- Mid Blue Stretch Denim
- Jalie Pull on Jeans
- Top Stitching Thread
- Jeans Needle
- Elastic for the Waistband
- Seam Marker Foot (optional - always check our compatibility charts in reference to your machine)
Have fun sewing!
Lucy
For more tips and tricks on how to make sewing easy you can follow our blog via Bloglovin and receive updates via email each time a new post is added.
Follow us on Facebook Twitter YouTube and Instagram for news, tutorials, special offers, sales and more.